Tuesday, February 3, 2015

"INSTALL_PARSE_FAILED_INCONSISTENT_CERTIFICATES", sign application with AOSP sign keys

One of my application was built within the AOSP Android platform. But I need to build that in Eclipse Android ADT and test that app separately on Android. While I was trying to debug that app on my phone using eclipse, I got that error "INSTALL_PARSE_FAILED_INCONSISTENT_CERTIFICATES". I know it could be the problem of the signing key, but how could I use the same one that was used in AOSP?

I referred to:

  • http://stackoverflow.com/questions/3635101/how-to-sign-android-app-with-system-signature
  • http://stackoverflow.com/questions/4247818/android-after-building-platform-source-how-to-sign-arbitrary-apk-with-platform
  • http://stackoverflow.com/questions/15754060/how-to-set-a-custom-keystore-for-debugging-in-eclipse-for-android
And I finally know how to do that.
  1. Locate the pk8 and cert files in AOSP project
    It's under the folder AOSP_PATH/build/target/product/security
  2. Download and install keytool-importkeypair from https://github.com/getfatday/keytool-importkeypair
  3. Make the keystore: keytool-importkeypair [-k keystore] [-p storepass] -pk8 pk8 -cert cert -alias key_alias
    Remember that the key_alias for Eclipse default debug key is androiddebugkey
  4. Setup eclipse to use the customized keystore
    Go to "Window->Preference->Android->Build" and set the Custome debug keystore to the one we just generated.
  5. Rebuild the app and now it should work.

Friday, January 30, 2015

Build Your Own Customized Android Kernel


Build Your Own Customized Android Kernel


Get Android and Kernel Source

Follow the instructions on AOSP Downloading the Source Tree to get the source of the Android Platform you're going to work on. It takes about 1 or 2 hours which depends on your network to download the source tree!

Build and Run Android with Prebuilt Kernel

Make sure you setup the build environment following this link. You need to download and install Oracle JDK manually if you use other linux distributions other than ubuntu or you just want to try. You can refer to this tutorital to install and setup Oracle JDK. After that, you can build and run Android platform following the instructions. If you successfully build the kernel, you'll see the output like this:
... ... Installed file list: out/target/product/generic/installed-files.txt Target system fs image: out/target/product/generic/obj/PACKAGING/systemimage_intermediates/system.img Install system fs image: out/target/product/generic/system.img
Note that the emulator tool in which you should run the platform you built is on the path out/host/linux-x86/bin/, not the one you installed in your Android SDK.
For the users of Ubuntu 12.04 or higher version, it's better to use gcc-4.4 and g++-4.4 (gcc-4.4-multilib and g++-4.4-multilib for 64-bit machine) and that will save you lots of problems and time!! Just use make CC=gcc-4.4 CXX=g++-4.4

Download and Build Kernel

The amazing thing about Android is that you can use your own customized linux kernel. Also, there are instructions on AOSP about how to download and build the kernel you'd like to hack. You can also browse all the projects on the site https://android.googlesource.com/, find the kernel project and add it to repo manifest file .repo/manifest.xml as follows: Then use command repo sync to download the kernel. To build kernel for goldfish android emulator, you need to download the kernel for goldfish and issue the following commands:
$ export ARCH=arm
$ export SUBARCH=arm
$ export CROSS_COMPILE=arm-eabi-
$ make goldfish_armv7_defconfig
# # configuration written to .config #
$ make
Instead of export ARCH and CROSS_COMPILE everytime you build the kernel, you can add them to Makefile file of the kernel. The image is output as arch/arm/boot/zImage. You can run Android with this customized kernel image by
$ emulator -kernel [path to kernel image]

Monday, January 26, 2015

Extend keyguard screen lock

In the last post, we discussed how to extend the screen lock settings for the face enrollment. This post will continue that and talks a bit further to the keyguard part. First, I want show you the sequence diagram of keyguard view management.
Keyguard view management sequence diagram
This diagram illustrates the whole picture of how keyguard is stated and the view is initialized. The first three classes are located at frameworks/base/policy/src/com/android/internal/policy/impl/keyguard of Android system source code. The KeyguardServiceDelegate class is the service interface which can communicate with the KeyguardServiceWrapper and direct requests from the clients that connect with the service. KeyguardServiceWrapper implements the IKeyguardService interface defined in frameworks/base/core/java/android/app/admin/IKeyguardService.aidl. It's the class that actually calls the service methods. The KeyguardService implementation is located at "frameworks/base/packages/Keyguard/src/com/android/keyguard/KeyguardService.java". It implements the methods in IKeyguardService and expose the services.
Now we are arriving at the KeyguardService implementation part. The source codes for KeyguardViewMediator, KeyguardViewManager, KeyguardHostView and KeyguardSecurityView are in the "frameworks/base/packages/Keyguard/src/com/android/keyguard" folder. We'll discuss them in detail.
  1. KeyguardViewMediator
    This is the first class that deals with keyguard screen lock view. Like its name, KeyguardViewMediator is the scheduler of keyguard views and keep monitoring the state change of the phone. The doKeyguardLocked function of this class makes a list of checks about whether keyguard should show. At last it calls showLocked and invokes the show function of KeyguardViewManager.
  2. KeyguardViewManager
    Move directly to the show function which is supposed to show the keyguard. There are three key objects in this function: mKeyguardHost of type ViewManagerHost, mViewManger of type ViewManger and mKeyguardView of type KeyguardHostView. The ViewMangerHost class is defined in KeyguardViewManger.java and is inherited from FrameLayout. It setup the layout parameters of the view and make the view visible. So where are mKeyguardView and mKeyguardHost initialized? It's right in the function maybeCreateKeyguardLocked. In that function, the mKeyguardHost is being created and added to the view group. The layout parameters are also set up here. Then it calls the inflateKeyguardView function to inflate the keyguard_host_view which is defined in "frameworks/base/packages/Keyguard/res/layout-land/keyguard_host_view.xml".  Then it calls the  show function of KeyguardHostView.
  3. KeyguardHostView
    The control finally goes to the showSecurityScreen function of KeyguardHostView. It's in this function that we loaded the corresponding unlock view as we setup in the screen lock settings. It retrieves the current unlock view by the getSecurityView function based on current security mode. If the security view has not been added yet, it inflates the corresponding layout which is obtained by the getLayoutIdFor(securityMode) function. We added out face unlock entry in this function and define the layout as keyguard_biometric_face_view.xml in "frameworks/base/packages/Keyguard/res/layout". The source code for the view is "frameworks/base/packages/Keyguard/src/com/android/keyguard/KeyguardBiometric FaceView.java". It implements KeyguardSecurityView and SurfaceHolder.Callback to show camera preview.
  4. KeyguardSecurityView
    This is the unlock view class we actually put our unlock mechanism in. There are two problems in this class we need to deal with:
    • How to show camera preview
    • How to communicate with the face recognition activity
    When I search solution for the first problem, the most possible answer I could find is to add a SurfaceView container in the layout and add the SurfaceView in the keyguard view group. However, the camera would not show preview no matter how I initialize the SurfaceView. I realized it could be the keyguard window that forbids the preview of camera. Then I checked the original face unlock view of Android system,


      void handleServiceConnected() {
            Log.d(TAG, "handleServiceConnected()");
    
            // It is possible that an unbind has occurred in the time between the bind and when this
            // function is reached.  If an unbind has already occurred, proceeding on to call startUi()
            // can result in a fatal error.  Note that the onServiceConnected() callback is
            // asynchronous, so this possibility would still exist if we executed this directly in
            // onServiceConnected() rather than using a handler.
            if (!mBoundToService) {        
                Log.d(TAG, "Dropping startUi() in handleServiceConnected() because no longer bound");
                return;
            }
    
            try {
                mService.registerCallback(mFaceUnlockCallback);
            } catch (RemoteException e) {  
                Log.e(TAG, "Caught exception connecting to Face Unlock: " + e.toString());
                mService = null;
                mBoundToService = false;       
                mIsRunning = false;            
                return;
            }
    
            if (mFaceUnlockView != null) { 
                IBinder windowToken = mFaceUnlockView.getWindowToken();
                if (windowToken != null) {     
                    // When switching between portrait and landscape view while Face Unlock is running,
                    // the screen will eventually go dark unless we poke the wakelock when Face Unlock
                    // is restarted.               
                    mKeyguardScreenCallback.userActivity(0);
    
                    int[] position;                
                    position = new int[2];         
                    mFaceUnlockView.getLocationInWindow(position);
                    startUi(windowToken, position[0], position[1], mFaceUnlockView.getWidth(),
                            mFaceUnlockView.getHeight());
                } else {
                    Log.e(TAG, "windowToken is null in handleServiceConnected()");
                }
            }
        }
    
    
    I have an interesting finding. Since the face unlock code is proprietary from pittpatt which is now acquired by Google, we can not see the source code for the face unlock service. However, I get to know it uses the bound service to communicate with the face unlock model. And even more inspiring,  the startUi function exposes some implementation of the service. It passes the windowToken of keyguard window, the location and size of the face unlock view "place holder". Yes, I call it "place holder" since I believe it's only a place holder for the actual face unlock view which is added in the service implementation. So that in the face unlock view we can define the window parameters for the camera preview, which could solve the problem of camera preview won't show on keygurad window.
    So the next question is, "is it possible to create new view element in the background service?".  Yes, it is possible to draw window in the background service. The facebook chatheads proves that according to this article http://www.piwai.info/chatheads-basics/. So we did exactly the same thing, draw a new window at the place holder with the same location and size and set the window type to be TYPE_SYSTEM_OVERLAY. And also we want to keep the screen on while conducting the face unlock, we can set the FLAG_KEEP_SCREEN_ON to the new window. Then add SurfaceView to this window, the camera preview will show up this time!
    Now we are almost done unless for the face recognition service. I used two-way bound service for communication between the service and KeyguardSecurityView.
Acknowledgement:
Some of the content from this post refers the following websites:
  •  http://www.programering.com/a/MDOyIDNwATQ.html
  • http://www.cnblogs.com/haiming/p/2989678.html
  • pittpatt proprietary files: https://github.com/jamesonwilliams/vendor_google_gapps/tree/android-4.4.2_r1/proprietary/optional/face/vendor/pittpatt/models/detection/multi_pose_face_landmark_detectors.7
  •  facelock.apk: https://github.com/jamesonwilliams/vendor_google_gapps/find/android-4.4_r1.1/
  • Include jar in Android.mk: http://www.cnblogs.com/hopetribe/archive/2012/04/23/2467060.html
  • Chathead Basics:http://www.piwai.info/chatheads-basics/
  •   Binder and Window Tokens: http://www.androiddesignpatterns.com/2013/07/binders-window-tokens.html

Friday, January 23, 2015

Extend screen unlock setting

General idea of the stuff I put into Android system: We want to add our own face recognition program to Android system as one of the screen unlock methods. Basically, there are two things we need to consider:
  1. Add face unlock entry to the Settings->Security->Screen lock menu as shown in fig. 1 (a).
  2. Add face unlock view to Android screen lock as shown in fig. 1 (b).
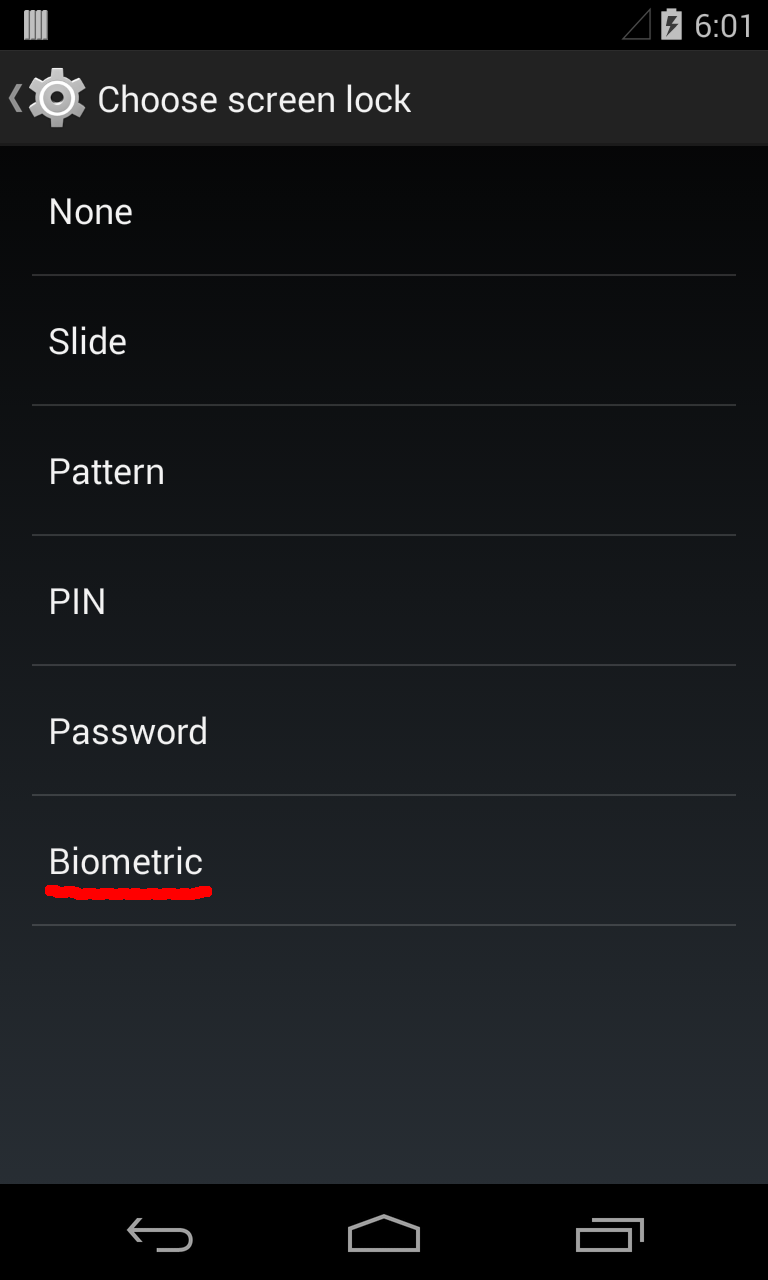
Face unlock settings
Fig1. (a) screen lock settings Fig. 1 (b) face unlock view
Before start, you'll need a Android system build tool chain, Android source code, Android SDK and an Android phone. Following is my spec. of development environment:
  • LG Nexus 4
  • AOSP: android-4.4.2_r2
  • Eclipse Luna with ADT plugin (Android API 19)
 OK, to figure it out how to extend Android system with the face recognition unlock, I spent a lot of time searching related articles. I don't think there are much articles and tutorials online that talk the whole process thoroughly. I did find people discussing related problems, but it's still hard to get the whole picture. Therefore, this article is all about how I integrated face unlock to android screen unlock code stacks.

Extend screen unlock settings

Add biometric entry to the unlock list in file “packages/apps/Settings/res/xml/security_settings_picker.xml” below "unlock_set_password" preference screen declaration


The definitions for the plain strings are in the "packages/apps/Settings/res/values/strings.xml"file. We add the unlock_set_biometric_strong below the "unlock_set_unlock_password_summary" as:

Biometric
Strong security, on trail
So that's the interface part, we need also figure out how the inner method call works.
Fig. 2 Face unlock settings sequence diagram
Fig. 2 illustrates the sequence diagram of how the interfaces interact. It all starts from the SecuritySettings class. The inheritance hierarchy is shown in Fig. 3.
Fig 3. SecuritySettings Class
We can see from the figure, eventually it extends Fragment class. According to android developers's page, "Fragment is a piece of an application's user interface or behavior that can be placed in an Activity. Interaction with fragments is done through FragmentManager, which can be obtained via Activity.getFragmentManager() and Fragment.getFragmentManager()". A Fragment is a small buildng block of the activity interface with its own life cycle depend on the activity life cycle. The method that conduct the UI inflation in this class is createPreferenceHierarchy. What this function does is generally load the UI componets and setup the preference. To load the UI fragment for screen security section, it retrieve the current screen lock password quality by invoking getKeyguardStoredPasswordQuality() method of LockPatternUtils class. For biometric authentication method, we add the usingBiometricStrong method to determine if face unlock method has been checked or not. If it is using face unlock, the resource id would be set to the face unlock preference screen interface id. Note that the function first check if the current unlock method is secure or not secure by the LockPatternUtils.isSecure function.
 public boolean isSecure() {
        long mode = getKeyguardStoredPasswordQuality();
        final boolean isPattern = mode == DevicePolicyManager.PASSWORD_QUALITY_SOMETHING;
        final boolean isPassword = mode == DevicePolicyManager.PASSWORD_QUALITY_NUMERIC
                || mode == DevicePolicyManager.PASSWORD_QUALITY_ALPHABETIC
                || mode == DevicePolicyManager.PASSWORD_QUALITY_ALPHANUMERIC
                || mode == DevicePolicyManager.PASSWORD_QUALITY_COMPLEX;
        final boolean isBiometricStrong = mode == DevicePolicyManager.PASSWORD_QUALITY_BIOMETRIC_STRONG;
        final boolean secure = isPattern && isLockPatternEnabled() && savedPatternExists()
                || isPassword && savedPasswordExists() || isBiometricStrong;
        return secure;
    }  
We add the biometric authentication also to be secure.
After that, it calls the addPreferencesFromResource of the PreferenceActivity class which "Inflates the given XML resource and adds the preference hierarchy to the current preference hierarchy".

Then as the other UI components, it waits for user action and pass control to other component. For PreferenceActivity class or subclasses, the action handler function in response to user click is onPreferenceTreeClick. It determines which preference element is being clicked by checking the preference key for each UI element. But what's the key of preference? Where was it set? Remember in the createPreferenceHierarchy we loaded the preference by resource id? It's right in the xml files that define the corresponding UI interfaces that the IDs are declared.
Following is the security_settings_biometric_strong.xml file that defines the settings interface when the biometric unlock is selected. We can see that line "android:key="unlock_set_or_change"" is where the preference key is set.
By checking the key, it starts the ChooseLockGeneric fragment when the screen lock entry is clicked.
final String key = preference.getKey();

        final LockPatternUtils lockPatternUtils = mChooseLockSettingsHelper.utils();
        if (KEY_UNLOCK_SET_OR_CHANGE.equals(key)) {
            startFragment(this, "com.android.settings.ChooseLockGeneric$ChooseLockGenericFragment",
                    SET_OR_CHANGE_LOCK_METHOD_REQUEST, null);
        } else if (KEY_BIOMETRIC_WEAK_IMPROVE_MATCHING.equals(key)) {
            ChooseLockSettingsHelper helper =
                    new ChooseLockSettingsHelper(this.getActivity(), this);
            if (!helper.launchConfirmationActivity(
                    CONFIRM_EXISTING_FOR_BIOMETRIC_WEAK_IMPROVE_REQUEST, null, null)) {
                // If this returns false, it means no password confirmation is required, so
                // go ahead and start improve. 
                // Note: currently a backup is required for biometric_weak so this code path
                // can't be reached, but is here in case things change in the future
                startBiometricWeakImprove();   
            }

And ChooseLockGenericFragment is also of the SettingsPreferenceFragment type. Take a look at the onCreate function of the fragment
 @Override             
        public void onCreate(Bundle savedInstanceState) {
            super.onCreate(savedInstanceState);                                                                                               

            mDPM = (DevicePolicyManager) getSystemService(Context.DEVICE_POLICY_SERVICE);                                                     
            mKeyStore = KeyStore.getInstance();
            mChooseLockSettingsHelper = new ChooseLockSettingsHelper(this.getActivity());                                                     

            // Defaults to needing to confirm credentials
            final boolean confirmCredentials = getActivity().getIntent()
                .getBooleanExtra(CONFIRM_CREDENTIALS, true); 
            if (getActivity() instanceof ChooseLockGeneric.InternalActivity) {
                mPasswordConfirmed = !confirmCredentials;                                                                                     
            }

            if (savedInstanceState != null) {  
                mPasswordConfirmed = savedInstanceState.getBoolean(PASSWORD_CONFIRMED);
                mWaitingForConfirmation = savedInstanceState.getBoolean(WAITING_FOR_CONFIRMATION);
                mFinishPending = savedInstanceState.getBoolean(FINISH_PENDING);                                                               
            }

            if (mPasswordConfirmed) {          
                updatePreferencesOrFinish(); 
            } else if (!mWaitingForConfirmation) {
                ChooseLockSettingsHelper helper =      
                        new ChooseLockSettingsHelper(this.getActivity(), this);
                if (!helper.launchConfirmationActivity(CONFIRM_EXISTING_REQUEST, null, null)) {
                    mPasswordConfirmed = true; // no password set, so no need to confirm                                                      
                    updatePreferencesOrFinish(); 
                } else {      
                    mWaitingForConfirmation = true;                                                                                           
                }
            }
        }


the settings program doesn't show the unlock methods list to the user directly. It first checks if the current user has confirmed the unlock credential or not. If so, the undatePreferenceOrFinish function will be called.
 private void updatePreferencesOrFinish() {
            Intent intent = getActivity().getIntent();
            int quality = intent.getIntExtra(LockPatternUtils.PASSWORD_TYPE_KEY, -1);
            if (quality == -1) {
                // If caller didn't specify password quality, show UI and allow the user to choose.
                quality = intent.getIntExtra(MINIMUM_QUALITY_KEY, -1);
                MutableBoolean allowBiometric = new MutableBoolean(false);
                quality = upgradeQuality(quality, allowBiometric);
                final PreferenceScreen prefScreen = getPreferenceScreen();
                if (prefScreen != null) {
                    prefScreen.removeAll();
                }
                addPreferencesFromResource(R.xml.security_settings_picker);
                disableUnusablePreferences(quality, allowBiometric);
            } else {
                updateUnlockMethodAndFinish(quality, false);
            }
        }
In the caller doesn't already specify the password quality, it will load the security_settings_picker preference tree and let the user select unlock method. Otherwise, it goes directly to the updateUnlockMethodAndFinish function. If the control flow goes from the security_settings_picker and the user pick up the unlock method, it also goes to the updateUnlockMethodAndFinish. So let's check what happens in that method.
       void updateUnlockMethodAndFinish(int quality, boolean disabled) {
            // Sanity check. We should never get here without confirming user's existing password.
            if (!mPasswordConfirmed) {
                throw new IllegalStateException("Tried to update password without confirming it");
            }

            final boolean isFallback = getActivity().getIntent()
                .getBooleanExtra(LockPatternUtils.LOCKSCREEN_BIOMETRIC_WEAK_FALLBACK, false);

            quality = upgradeQuality(quality, null);

            if (quality >= DevicePolicyManager.PASSWORD_QUALITY_NUMERIC) {
                int minLength = mDPM.getPasswordMinimumLength(null);
                if (minLength < MIN_PASSWORD_LENGTH) {
                    minLength = MIN_PASSWORD_LENGTH;
                }
                final int maxLength = mDPM.getPasswordMaximumLength(quality);
                Intent intent = new Intent().setClass(getActivity(), ChooseLockPassword.class);
                intent.putExtra(LockPatternUtils.PASSWORD_TYPE_KEY, quality);
                intent.putExtra(ChooseLockPassword.PASSWORD_MIN_KEY, minLength);
                intent.putExtra(ChooseLockPassword.PASSWORD_MAX_KEY, maxLength);
                intent.putExtra(CONFIRM_CREDENTIALS, false);
                intent.putExtra(LockPatternUtils.LOCKSCREEN_BIOMETRIC_WEAK_FALLBACK,
                        isFallback);
                if (isFallback) {
                    startActivityForResult(intent, FALLBACK_REQUEST);
                    return;
                } else {
                    mFinishPending = true;
                    intent.addFlags(Intent.FLAG_ACTIVITY_FORWARD_RESULT);
                    startActivity(intent);
                }
            } else if (quality == DevicePolicyManager.PASSWORD_QUALITY_SOMETHING) {
                Intent intent = new Intent(getActivity(), ChooseLockPattern.class);
            intent.putExtra("key_lock_method", "pattern");
                intent.putExtra(CONFIRM_CREDENTIALS, false);
                intent.putExtra(LockPatternUtils.LOCKSCREEN_BIOMETRIC_WEAK_FALLBACK,
                        isFallback);
                if (isFallback) {
                    startActivityForResult(intent, FALLBACK_REQUEST);
                    return;
                } else {
                    mFinishPending = true;
                    intent.addFlags(Intent.FLAG_ACTIVITY_FORWARD_RESULT);
                    startActivity(intent);
                }
            } else if (quality == DevicePolicyManager.PASSWORD_QUALITY_BIOMETRIC_WEAK) {
                Intent intent = getBiometricSensorIntent();
                mFinishPending = true;
                startActivity(intent);
            } else if (quality == DevicePolicyManager.PASSWORD_QUALITY_BIOMETRIC_STRONG) {
                Intent intent = new Intent();
                intent.setClass(getActivity(), ChooseLockBiometric.class);
                //intent.setClassName("edu.temple.dulab.biounlock", "edu.temple.dulab.biounlock.FaceEnroll");
                //intent.addFlags(Intent.FLAG_ACTIVITY_FORWARD_RESULT);
                mFinishPending = true;
                startActivity(intent);
            } else if (quality == DevicePolicyManager.PASSWORD_QUALITY_UNSPECIFIED) {
                mChooseLockSettingsHelper.utils().clearLock(false);
                mChooseLockSettingsHelper.utils().setLockScreenDisabled(disabled);
                getActivity().setResult(Activity.RESULT_OK);
                finish();
            } else {
                finish();
    }
        }

Basically it switches control to other activity according to the selected password quality. So here we add the "PASSWORD_QUALITY_BIOMETRIC_STRONG" branch to direct the program to the face enrollment activity (ChooseLockBiometric). It that activity, we include a button to start face enrollment in the view.
       // FacerecActivity in com.philriesch.android.vflock;
                Intent intent = new Intent();
                intent.setClassName("com.philriesch.android.vflock", "com.philriesch.android.vflock.FacerecActivity");
                intent.putExtra(EXTRA_ENROLLMODE, true);
                startActivityForResult(intent, REQUEST_ENROLL_FACE);

We start the FacerecActivity located in the "com.philriesch.android.vflock" package. Once the activity result is received and is OK, we set the selected PASSWORD_TYPE_KEY to be PASSWORD_QUALITY_BIOMETRIC_STRONG and set the password quality for DPM in the LockPatternUtils instance.
That's the face enrollment extension to Android screen settings. Next we'll talk about extend keyguard to support face unlock.

Monday, January 12, 2015

Error: Couldn't load opencv_java from loader...

Build Android system app that requires opencv library could result in this opencv library loading error. One way to get around this is to build the shared library with the app. Here is the snippet of Android.mk that define the opencv_java module
...
include $(CLEAR_VARS)
LOCAL_MODULE    := libopencv_java
LOCAL_SRC_FILES := libs/armeabi/libopencv_java.so
include $(BUILD_PREBUILT)
...
To build the prebuilt library into system, include $(BUILD_PREBUILT) instead of $(PREBUILT_SHARED_LIBRARY). I tried the latter, the system still could locate the opencv library files.

Friday, January 9, 2015

Eclipse hangs on startup with the error essage " The org.eclipse.m2e.logback.configuration bundle was activated before the state location was initialized."

My eclipse version is Version: Luna Service Release 1 (4.4.1) The way I addressed that problem is: Delete the *.snap files under your eclipse workspace ".metadata/.plugins/org.eclipse.core.resources/" Be aware that after I restart eclipse, the projects under that workspace that I'm working on are gone. I need to re-import the projects later.

Monday, September 29, 2014

CC150 2.3 - Delete node in a singly linked list with only access to that node

For this interview question, the answer is not a common way to remove a node in  a singly linked list. Basically, you redirect the next node pointer of the previous node to the next pointer of the node you want to remove. Since you only have access to the current node, the tricky solution is you can replace current node with the next one. However, it is impossible to do that if the node is the last one of the list.
class Test2_3 {
    public static void main(String argv[]) {
        int todel = 4;
        if(argv.length > 0) {
            todel = Integer.parseInt(argv[0]);
        }
        Random rand = new Random(System.currentTimeMillis());
        // Create a list instance
        List list = new List();
        Node nodedel = null;
        for(int i = 0; i < 10; i++) {
            Node n = new Node(rand.nextInt(10));
            if(i == todel-1)  nodedel = n;
            list.attach(n);
        }
        System.out.printf("Remove %dth node of the list: ", todel);
        list.print();
        // Remove
        if(nodedel != null && nodedel.next != null) {
            Node next = nodedel.next;
            nodedel.data = next.data;
            nodedel.next = next.next;
        } else {
            System.out.println("Could not remove the last one!");
        }
        list.print();

    }
}   

Friday, September 19, 2014

Find supported image formats by matplotlib package in python

While you call matplotlib.figure.savefig, you may be wondering what type of figure I can save. You can find the answer by entering some commands in python.

By checking backend engines of pyplot
import matplotlib
['GTK', 'GTKAgg', 'GTKCairo', 'FltkAgg', 'MacOSX', 'QtAgg', 'Qt4Agg', 'TkAgg', 'WX', 'WXAgg', 'CocoaAgg', 'agg', 'cairo', 'emf', 'gdk', 'pdf', 'ps', 'svg', 'template']

By checking the supported file types by canvas object
>>> import matplotlib.pyplot as plt
>>> fig = plt.figure()
>>> print fig.canvas.get_supported_filetypes()
{'svgz': 'Scalable Vector Graphics', 'tiff': 'Tagged Image File Format', 'jpg': 'Joint Photographic Experts Group', 'raw': 'Raw RGBA bitmap', 'jpeg': 'Joint Photographic Experts Group', 'png': 'Portable Network Graphics', 'ps': 'Postscript', 'emf': 'Enhanced Metafile', 'svg': 'Scalable Vector Graphics', 'eps': 'Encapsulated Postscript', 'rgba': 'Raw RGBA bitmap', 'pdf': 'Portable Document Format', 'tif': 'Tagged Image File Format'}

Thursday, August 14, 2014

Android Glossary


obfuscate: Obfuscators replace these names with short, machine generated alternatives.This makes it more difficult to intuit the purpose of these functions without access to the original source code.
http://android-developers.blogspot.com/2010/09/securing-android-lvl-applications.html
http://android-developers.blogspot.com/2010/09/proguard-android-and-licensing-server.html

Java reflection: Enable language to inspect and dynamically classes, methods and attributes at run-time.

dynamic class-loading: Load and reload class dynamically at runtime in Java. The program doesn't know the name of the class before being executed. In Java, loading classes at runtime must be done by subclass of java.lang.ClassLoader.

root exploit:Attain privileged control (root access) of the system.  While the concept of Apple community's jailbreak is different by two additional factors of unlocking the bootloader, enable sideloading.

zero day: Malwares/Virus whose detection signature has not been obtained.

honeypot: a trap set to detect, deflect, or, in some manner, counteract attempts at unauthorized use of information systems

Wednesday, August 13, 2014

Repeating number problem - 3


Given a (potentially large) array of integers, all but one repeating an even number of times, how would you find the one repeating an odd number of times in an efficient way? eg [1 2 3 3 2 2 1 4 2] should return 4

Method 1: Use map data structure to track the occur times of the number in the list. Then loop through the map to find the number occurs even times.
Output:
Number occur even times: 6


Method 2: Find the unique set of the integer array and append the unique set to the original array. Then XOR the new array leaving only the number repeat even times. The trick is XOR with odd times itself remains zeros, XOR with even times itself remains itself.
Output:
Number that occurs even times: 6

Repeating number problem - 2

Given an array in which all numbers except two are repeated once. (i.e. we have 2n+2 numbers and n numbers are occurring twice and remaining two have occurred once). Find those two numbers in the most efficient way.

Method 1: Use xor operators only to find the two non duplicate numbers. Xor all (2n+2) numbers first, then the n duplicate numbers are cancelled out, leaving the two unique number being XORed. The set bits in the result indicate bits at which the two numbers differ. The bit in a specific position can be either set or clear. Correspondingly, we can divide the numbers into set group numbers and clear group numbers w.r.t the set/diff bits in the result. Since all the other numbers repeat once, it doesn't change the XORed result either in the set group or the clear group. Thus, the XOR of set group and clear group are the two numbers occurred only once.
To divide numbers into set and clear group, we need to extract the set/diff bit of all 2n+2 numbers, here is the way to extract the right most diff/set bit of the XOR result of all 2n+2 numbers.
int diffBitMask = xor & ~(xor-1);
xor-1 zero the right most set bit and keep the other set bits. The complement operator ~ mask off the other set bits and set the right most one.

The code is as follows:
public class Main {
    public static void main(String args[]) {
        int arr[] = {1, 2, 6, 1, 6, 8, 7, 8};
        findNonDuplicate(arr);
    }
    public static void findNonDuplicate(int arr[]) {
        int xor = 0, xor1 = 0, xor2 = 0;
        // Xors of the all numbers, obtaining the difference mask of two numbers
        for(int i = 0; i < arr.length; i++) {
            xor ^= arr[i];
        }
        int diffBitMask = xor & ~(xor-1);   // Right most set/diff bit
        // Grouping based on the diff bit
        for(int i = 0; i < arr.length; i++) {
            if((arr[i] & diffBitMask) > 0) {
                xor1 ^= arr[i];
            } else {
                xor2 ^= arr[i];
            }
        }
        System.out.println("The two numbers that occur once are: " + xor1 + ", " 
                + xor2);
    }
}   
Output is:
The two numbers that occur once are: 7, 2


Repeating number problem - 1

Here is the collection of problems that related to finding  the duplicate numbers in a array.

1. Given an array of numbers ranging from 1 to N, in which numbers could repeat itself any number of times, find the duplicate numbers in O(n) with constant memory space.

Method 1: Use an extra array keep track of the elements counting.

public class Duplicate {
    public static void main(String args[]) {
        int arr[] = {1, 3, 5, 8, 5, 7, 4, 2, 4};
        findDuplicate(arr);

    }
    public static void findDuplicate(int arr[]) {
        // Using the current number as the key/index to the value
        for(int i = 0; i < arr.length; i++) {
            // Positvie - never seen before
            if( arr[Math.abs(arr[i]) - 1] > 0 )  {
                arr[Math.abs(arr[i]) - 1] =  -arr[Math.abs(arr[i]) - 1];
            }
            // Negative - already seen, duplicate 
            else if(arr[Math.abs(arr[i]) - 1] < 0) {
                System.out.print(Math.abs(arr[i]) + " ");
                arr[Math.abs(arr[i]) - 1] = 0;
            }
            else {// 0 - already detected
            }
        }
        System.out.println();
    }
}
output:
5 4

Wednesday, June 25, 2014

Short travel to Baltimore

趁着QQ去Baltimore开会的机会去感受一下这个马里兰州最大的城市。巴尔的摩是大西洋沿岸重要的海港城市,有着得天独厚的海运条件,紧邻的切萨皮克湾很宽广,而且航道很深,万吨级的远洋轮可直接驶入巴尔的摩港区,它是美国五大湖去,中央盆地与大西洋上联系的一个重要的出海口。在这个工业港口城市里,黑人约占55%,这里既有1812年间美国独立战争时的遗迹,也有内战期间亲南民众与政府军之间的弹火冲突。有意思的是这里是美国国歌的诞生地,1904年的巴尔的摩大火催生了国家标准与技术院(NIST)。
周六上午在费城30街Amtrak火车站搭乘驶向Baltimore的火车。车厢内有免费的Wifi,到Baltimore大概一个小时的路程。刚下火车感觉破破烂烂的,有点费城的味道。出了火车站,我们坐taxi来到之前预订的QualityInn,进门之后有股阴暗发霉的味道,房间里也很阴暗。不过酒店离QQ开会的地方还是很近的,遂我们决定先去那边转转,顺道搞些吃的。我们沿着接到走了10分钟左右就到了Baltimore的商业观光区Inner Harbor。这里是由之前的工业区和居民区转变成的观光旅游去。内港上有各式各样的油轮,皮挺和脚踏船,还有各式各样的餐厅。来到港口城市当然不能少了海鲜,正赶上这里的crab & beer festival,一家历史悠久的海鲜餐厅Phillips就坐落在这里。正好遇到QQ的lab mates,我们4个人就坐下开始享受海鲜大烩了。我们点了著名的blue crab和其他贝壳累的海鲜。抱参之后我们就去看之前查过的出租自行车的店了,这个时候我的肚子又不争气了,回来的途中拉了一路。。
由于受不了QualityInn阴暗的环境,我们第二天又搬进了附近的一家叫作brookshire suits的酒店,这次环境好多了,而且离开会的地方又尽了些。我拿出跑鞋开始了在Baltimore的第一次慢跑,一路上随手拍了一些Inner Harbor的景色。


What you 'can' and 'cannot' do with Tizen SDK for Wearable

I was trying to using Samsung galaxy gear 2 for Bluetooth device discovering and audio recording. However, the SDK wouldn't let me create a native project. So I figured out I could using the Web App API to control the Bluetooth and microphone components of the watch. I was wrong, these features are not supported yet according to the release notes of the SDK.

The Bluetooth

They mentioned in the SDK version 1.0.0b1:
Device APIs to access to a device’s platform capabilities support
  • Alarm, Application, Bluetooth, Filesystem, System Information, Power, Motion(currently pedometer supported), SAP(communication between host and wearable device) API
But in the SDK version 1.0.0b2, they stated:
The Bluethooth API , which was incorrectly listed in the supported API lists in the 1.0.0b1 release note, is now removed in the list

The Microphone/Audio Input

It's not clear whether audio recording is supported or not now. In their release note 1.0.0b1 they stated that the SDK support webkit framework and HTML5 audio/video element. And in the release note 1.0.0b2, they also stated in the fixed bugs section:
  • Audio recording support with Camera API.
    • “audio:true” of MediaStreamOptions is now supported in getUserMedia() API
    • Audio recording is supported with Camera API by passing audio-only MediaStream object to createCameraControl() API
    • Supported audio recording format : AMR and 3GP
In a word, for Tizen SDK for wearable, control of Bluetooth is not supported yet and audio may be supported by using HTML 5 element (here is the link of how to capture audio/video in HTML 5: http://www.html5rocks.com/en/tutorials/getusermedia/intro/).

Sunday, June 8, 2014

Make USB OTG work on Nexus 4

It's not a trivial stuff to make thumb USB drive / speaker / keyboard work on Nexus 4 since USB host / OTG is not supported by Nexus 4. It needs hacking from both hardware and software aspects to make it work.

Hardware

In order to use USB OTG devices on Nexus 4, you have to use a special USB OTG Y-Cable like this one:
 
Because Nexus 4 Micro-USB host doesn't have power supply to the USB devices, so we need to use external power supply. We bought an 3000mah power bank like this one:
 

 That's it. Next we need to take care of the Android system.

Software / Android ROM

The built-in kernel of Android system doesn't have USB-OTG support. Yes, you are right, I don't understand why they cut off such useful feature, either. Maybe for power saving, lower cost? Anyway, it's not a problem for the hackers!

WARN: The following operations needs some basic hacker skills such as flashing a now system ROM, use of adb and fastboot. Even you do have that kind of skills, you may also turn your Android to a brick. So read carefully before you start hacking.

  1. Install the recovery image
    The recovery image is used to take care of the operations such as wiping the data partition, install a new ROM/zip file when your Android phone is in recovery mode. I followed some tutorials online, then I decide I'll use the CWM recovery. You may also try TWRP recovery which is also frequently used.
    Download recovery image for your device: http://clockworkmod.com/rommanager
    Open a terminal, reboot the device into fastboot mode by typing
    adb reboot-bootloader 
    Or power off your device then press volume up, volume down and power simultaneously.
    Then flash recovery image onto your device by using the following command:
    fastboot flash recovery recovery.img

  2. Install Cyanogen system from recovey
    In order to get a rooted system (which is not necessary in my case), we downloaded and installed Cyanogenmod system: http://download.cyanogenmod.org/?device=mako&type=stable. At first I download newest/nightly ROM, but it doesn't let me using the WiFi after I flashed the ziddey-OTG kernel. Then I just use the stable Cyanogenmod version: cm-10.2.1-mako.zip (Android 4.3.1). Then use the recovery to install the new ROM.
    Reboot to recovery mode. Then select wipe data/factory reset. Then you can install zip from sdcard or from sideloading. You just keep the system image on your PC and issue the following command after you select install zip from sideload:
    adb sideload cm-10.2.1-mako.zip
    

    Then you'll have a Cyanogenmod system.
  3. Install ziddey USB OTG kernel
    ziddey-OTG kernel is a patch to the Franco-CM system to enable kernel OTG support. You can download the right version on this page: http://forum.xda-developers.com/nexus-4/orig-development/usb-otg-externally-powered-usb-otg-t2181820. And use adb sideload install the zip file.
  4. Try OTG!

Show Cases

Now it's time to show off your OTG devices!  First I use thumb USB drive on my Nexus 4.
Displaying photo.JPG
After plug in, you can check your storage from Settings->Storage->USB Storage.
The main reason I want to use OTG feature of Nexus 4 is for my fingerprint reader project. We have U.ARE.U Fingerprint Development Kit and need to use digitalPersona 5160 fingerprint reader on Nexus 4. Here is the screenshot showing it works on my Nexue 4:


Debugging with ADB from Wireless Connection

Want to debug the USB device using gdb but the micro-USB I/F has already been occupied? You can use the wireless network to make the connection from your PC to Nexus 4. First you need to turn adb to tcpip mode instead of using USB. Connect your phone to PC using USB cable, issue 'adb usb' to set adb running in USB mode first. Then 'adb tcpip 5555' to setup adb in internet mode. Then check the IP address of your android device on: Settings->About phone->Status->IP address. Connect adb host to device 'adb connect IP_addr'. If succeed, you'll see
$ adb devices
List of devices attached 
#.#.#.#:5555 devic
Details about adb wireless usage, please refer to: http://developer.android.com/tools/help/adb.html

Acknowledgement

Cyanogen Team:
[1] Install recovery image and Cyanogen system, http://wiki.cyanogenmod.org/w/Install_CM_for_mako
[2] Cyanogenmod ROM: http://download.cyanogenmod.org/?device=mako&type=stable

AndroidCentral
[1] USB OTG on Nexus 4: http://www.androidcentral.com/android-advanced-usb-otg-nexus-4
[2] Nexus 4 Unlock & Root: http://forums.androidcentral.com/nexus-4-rooting-roms-hacks/224861-guide-nexus-4-unlock-root.html

XDA Developers
[1] Externally powered USB OTG - Nexus 4: http://forum.xda-developers.com/nexus-4/orig-development/usb-otg-externally-powered-usb-otg-t2181820

Thursday, June 5, 2014

Build Android 4.2 AOSP project for Nexus 4


Make Your OWN Android AOSP System for Nexus 4


Build and Install AOSP JellyBeans Platform for Nexus 4 (Code named Mako)

Before start, make sure your already have a 64-bit linux system used for development! By saying 64-bit, I'm not kidding, because I've tried using my 32-bit poor Centos and failed with endless problems. Finally I found out only 64-bit development systems are supported by JellyBeans now! So get yourself a 64-bit linux system, or if you're a guy who likes hacking around and get the luck to successfully build a JB platform on 32-bit system, please let me know and share the happiness with you!
And please read through the standard android document from AOSP if you've never built an Android image before.
Guess you are out of patience to get your hands dirty to setup your nexus 4 running your own system. OK. let's start by downloading the latestest android system which integrated mako target. Your can find all the Android platforms in AOSP here The one I use is android-4.2.2_r1, which is the latest version when writing this article. I assume you've known how to download the source from AOSP. Otherwise, read the AOSP document Downloading the Source Tree.
Besides the platform source code, we need the driver binaries in order to run system on real devices. Official binaries can be downloaded from Google's Nexus driver page. Download and extract the vendor drivers of "Nexus 4 binaries for Android 4.2.2 (JDQ39)" on that page. Details about how to extract the proprietary binary drivers refer to the Obtaining proprietary binaries part. You'd better do this before build the platform, or you have to make clober and rebuild the whole system, which takes lots of time!
It's time to give birth to the new image now!
$ . build/envsetup.sh
$ lunch full_mako-eng
$ make -j[N]
Now we have our own system image at .../out/target/product/mako. We'll use fastboot to flash the system image. This requires a unlocked bootloader. The default bootloader is locked, but you can turn it to unlocked in the fastboot mode(press and hold both Volumn Up and Power or adb reboot-bootloader) by
fastboot oem unlock

Flash all in one single command: this writes boot, recovery and system images to corresponding partitions together. "-w" option can wipe cache partition and data.
cd out/target/product/mako 
fastboot -w flashall

Build Linux Kernel and Create Boot Image (Kernel + Init Ramdisk)

The kernel sources support nuxus 4 (mako) are in the Qualcomm MSM project, the latest kernel source can be downloaded:
git clone https://android.googlesource.com/kernel/msm -b android-msm-mako-3.4-jb-mr1.1
Now config and build the kernel: the built kernel will be output at arch/arm/boot/zImage
export CROSS_COMPILE=arm-linux-androideabi-
export ARCH=arm
make mako_defconfig
make -j[N]
You'll probably have an compile error if you following the instruction to this point.
drivers/gpu/msm/adreno.c:433:1: warning: the frame size of 1032 bytes is larger than 1024 bytes [-Wframe-larger-than=]
error, forbidden warning: adreno.c:433
make[3]: *** [drivers/gpu/msm/adreno.o] Error 1
This is caused by warn config stack frame size in the kernel. Therefore you need to make menuconfig and reconfig the CONFIG_FRAME_WARN value which located at Kernel hacking->Warn for stack frames larger than (needs gcc 4.4).
The tricky part is to make boot image using the kernel image built previously. Actually, the boot image consists of kernel image and init ramdisk image. Yes, we also need the ramdisk image so as to make the boot image. The approach is to extract the ramdisk image and kernel configuration file from the official boot.img in Google's factory image for nexus 4. This can be done by using abootimg tool. Some articles recommend "split_bootimg.pl", but doesn't work for nexus 4 or for me.
To extract kernel config file, kernel image and ramdisk image from official boot image: the outputs are bootimg.cfg zImage initrd.img respectively.
abootimg -x boot.img
Remove the bootsize property in bootimg.cfg as our kernel image can be larger than the one from the factory image. Now we can create our boot image by:
abootimg --create myboot.img -f boot.cfg -k [path-to-your-zImage] -r initrd.img
Verify the boot image without flashing it:
fastboot boot myboot.img
You can root Android by modify the official ramdisk image. First, un-gzip and un-cpio the official ramdisk image extracted from boot.img.
mkdir ramdisk && cd ramdisk
gunzip -c ../initrd.img | cpio -i
Edit default.prop file in the ramdisk, set "ro.secure=1" to "ro.secure=0".
Repack the ramdisk:
find . | cpio -o -H newc | gzip > ../myramdisk.gz
Now create the insecure boot image with this ramdisk image, which allows you to login as root.
abootimg --create myboot-rooted.img -f boot.cfg -k [path-to-your-zImage] -r myramdisk.gz
Flash your rooted boot image by
fastboot flash boot myboot-rooted.img

Check your kernel version when your Android system started!

References:

  • http://nosemaj.org/howto-build-android-nexus-4
  • http://forum.xda-developers.com/showthread.php?t=2131953

Thursday, May 8, 2014

Can't run native project on Galaxy Gear 2 ??

I just create and build a native project using Tizen SDK instead of SDK for Wearable since SDK for Wearable would not let me create a native Tizen project. However I can not launch the native App on Galaxy Gear 2 with the error message like this:
Cannot install application.

Error code: FATAL_ERROR
Error message: 
Command: /usr/bin/pkgcmd -q -i -t tpk -p /opt/usr/apps/tmp/Mf7csltynQ-1.0.0-arm.tpk
Management: Installation or uninstallation is not working temporarily.

So I searched for solutions on the internet. Unfortunately, all the people are saying Samsung doesn't support native project for Gear 2. 

http://developer.samsung.com/forum/board/thread/view.do?boardName=SDK&messageId=258302

https://developer.tizen.org/fr/forums/native-application-development/can-tizen-wearable-sdk-support-develop-native-app?langredirect=1

http://www.mautilus.com/tizen-and-qt/

Really don't understand why they release such a SDK only support Web project!!

Galaxy Gear 2 Start: sdb devices "No device listed"

When I first started prepare my development environment for Samsung Galaxy 2, a pretty trivial problem stops me. After I installed Tizen SDK and plugged my device to my laptop, I can not see it from "sdb devices". The result is just empty device list as below:
shuang@shuang-box:~$ sdb devices
List of devices attached
I keep searching the solution for this problem without result. There is a post on Tizen developer forum discussing the same problem: https://developer.tizen.org/forums/general-support/sdb-does-not-list-connected-test-device. But all the advice there have no effects for my case.

Then I realized it could be the setup on Galaxy Gear 2, so I press the system setup button and in the gear info sub-menu I found USB debugging  check box. There it is! I checked it and it works now.
shuang@shuang-box:~$ sdb devices
List of devices attached 
538131fd41001cb6 device SM-R380

Tuesday, April 15, 2014

Device name code in AOSP building system

Sometimes it's confusing trying to map the device name code to the corresponding hardware. I put the code and device name map here to make it easier to keep track of the supported hardware by Android.

ModuleCode
Nexus 5"hammerhead"
Nexus 7 [2013] (Wi-Fi)"flo"
Nexus 7 [2013] (Mobile)"deb"
Nexus 10"manta"
Nexus 4"mako"
Nexus 7 (Wi-Fi)"grouper"
Nexus 7 (Mobile)"tilapia"
Galaxy Nexus (GSM/HSPA+)"maguro"
Galaxy Nexus (Verizon)"toro"
Nexus S"crespo"
Nexus S 4G"crespo4g"
Motorola Xoom (US Wi-Fi)"wingray"

Apache2 + Tomcat 8 to host website

Just a memo for the steps I took to host my website on Amazon EC2 using tomcat 8 + apache2.

Install and config tomcat 

Put your website code to TOMCAT/webapps

Domain setup in tomcat

Edit TOMCAT/conf/server.xml, add a new host entry:


        www.rungist.com


Config proxy port in server.xml


Then restart tomcat

Install and config apache2

Use apt-get install apache2 to install the http server.
Config ProxyPass entry on /etc/apache2/httpd.conf
 
ProxyPass         /  http://rungist.com:8080/
ProxyPassReverse  /  http://rungist.com:8080/

Then restart apache2 service: sudo service apache2 restart

Refer:

https://tomcat.apache.org/tomcat-7.0-doc/proxy-howto.html