Friday, January 30, 2015

Build Your Own Customized Android Kernel


Build Your Own Customized Android Kernel


Get Android and Kernel Source

Follow the instructions on AOSP Downloading the Source Tree to get the source of the Android Platform you're going to work on. It takes about 1 or 2 hours which depends on your network to download the source tree!

Build and Run Android with Prebuilt Kernel

Make sure you setup the build environment following this link. You need to download and install Oracle JDK manually if you use other linux distributions other than ubuntu or you just want to try. You can refer to this tutorital to install and setup Oracle JDK. After that, you can build and run Android platform following the instructions. If you successfully build the kernel, you'll see the output like this:
... ... Installed file list: out/target/product/generic/installed-files.txt Target system fs image: out/target/product/generic/obj/PACKAGING/systemimage_intermediates/system.img Install system fs image: out/target/product/generic/system.img
Note that the emulator tool in which you should run the platform you built is on the path out/host/linux-x86/bin/, not the one you installed in your Android SDK.
For the users of Ubuntu 12.04 or higher version, it's better to use gcc-4.4 and g++-4.4 (gcc-4.4-multilib and g++-4.4-multilib for 64-bit machine) and that will save you lots of problems and time!! Just use make CC=gcc-4.4 CXX=g++-4.4

Download and Build Kernel

The amazing thing about Android is that you can use your own customized linux kernel. Also, there are instructions on AOSP about how to download and build the kernel you'd like to hack. You can also browse all the projects on the site https://android.googlesource.com/, find the kernel project and add it to repo manifest file .repo/manifest.xml as follows: Then use command repo sync to download the kernel. To build kernel for goldfish android emulator, you need to download the kernel for goldfish and issue the following commands:
$ export ARCH=arm
$ export SUBARCH=arm
$ export CROSS_COMPILE=arm-eabi-
$ make goldfish_armv7_defconfig
# # configuration written to .config #
$ make
Instead of export ARCH and CROSS_COMPILE everytime you build the kernel, you can add them to Makefile file of the kernel. The image is output as arch/arm/boot/zImage. You can run Android with this customized kernel image by
$ emulator -kernel [path to kernel image]

Monday, January 26, 2015

Extend keyguard screen lock

In the last post, we discussed how to extend the screen lock settings for the face enrollment. This post will continue that and talks a bit further to the keyguard part. First, I want show you the sequence diagram of keyguard view management.
Keyguard view management sequence diagram
This diagram illustrates the whole picture of how keyguard is stated and the view is initialized. The first three classes are located at frameworks/base/policy/src/com/android/internal/policy/impl/keyguard of Android system source code. The KeyguardServiceDelegate class is the service interface which can communicate with the KeyguardServiceWrapper and direct requests from the clients that connect with the service. KeyguardServiceWrapper implements the IKeyguardService interface defined in frameworks/base/core/java/android/app/admin/IKeyguardService.aidl. It's the class that actually calls the service methods. The KeyguardService implementation is located at "frameworks/base/packages/Keyguard/src/com/android/keyguard/KeyguardService.java". It implements the methods in IKeyguardService and expose the services.
Now we are arriving at the KeyguardService implementation part. The source codes for KeyguardViewMediator, KeyguardViewManager, KeyguardHostView and KeyguardSecurityView are in the "frameworks/base/packages/Keyguard/src/com/android/keyguard" folder. We'll discuss them in detail.
  1. KeyguardViewMediator
    This is the first class that deals with keyguard screen lock view. Like its name, KeyguardViewMediator is the scheduler of keyguard views and keep monitoring the state change of the phone. The doKeyguardLocked function of this class makes a list of checks about whether keyguard should show. At last it calls showLocked and invokes the show function of KeyguardViewManager.
  2. KeyguardViewManager
    Move directly to the show function which is supposed to show the keyguard. There are three key objects in this function: mKeyguardHost of type ViewManagerHost, mViewManger of type ViewManger and mKeyguardView of type KeyguardHostView. The ViewMangerHost class is defined in KeyguardViewManger.java and is inherited from FrameLayout. It setup the layout parameters of the view and make the view visible. So where are mKeyguardView and mKeyguardHost initialized? It's right in the function maybeCreateKeyguardLocked. In that function, the mKeyguardHost is being created and added to the view group. The layout parameters are also set up here. Then it calls the inflateKeyguardView function to inflate the keyguard_host_view which is defined in "frameworks/base/packages/Keyguard/res/layout-land/keyguard_host_view.xml".  Then it calls the  show function of KeyguardHostView.
  3. KeyguardHostView
    The control finally goes to the showSecurityScreen function of KeyguardHostView. It's in this function that we loaded the corresponding unlock view as we setup in the screen lock settings. It retrieves the current unlock view by the getSecurityView function based on current security mode. If the security view has not been added yet, it inflates the corresponding layout which is obtained by the getLayoutIdFor(securityMode) function. We added out face unlock entry in this function and define the layout as keyguard_biometric_face_view.xml in "frameworks/base/packages/Keyguard/res/layout". The source code for the view is "frameworks/base/packages/Keyguard/src/com/android/keyguard/KeyguardBiometric FaceView.java". It implements KeyguardSecurityView and SurfaceHolder.Callback to show camera preview.
  4. KeyguardSecurityView
    This is the unlock view class we actually put our unlock mechanism in. There are two problems in this class we need to deal with:
    • How to show camera preview
    • How to communicate with the face recognition activity
    When I search solution for the first problem, the most possible answer I could find is to add a SurfaceView container in the layout and add the SurfaceView in the keyguard view group. However, the camera would not show preview no matter how I initialize the SurfaceView. I realized it could be the keyguard window that forbids the preview of camera. Then I checked the original face unlock view of Android system,


      void handleServiceConnected() {
            Log.d(TAG, "handleServiceConnected()");
    
            // It is possible that an unbind has occurred in the time between the bind and when this
            // function is reached.  If an unbind has already occurred, proceeding on to call startUi()
            // can result in a fatal error.  Note that the onServiceConnected() callback is
            // asynchronous, so this possibility would still exist if we executed this directly in
            // onServiceConnected() rather than using a handler.
            if (!mBoundToService) {        
                Log.d(TAG, "Dropping startUi() in handleServiceConnected() because no longer bound");
                return;
            }
    
            try {
                mService.registerCallback(mFaceUnlockCallback);
            } catch (RemoteException e) {  
                Log.e(TAG, "Caught exception connecting to Face Unlock: " + e.toString());
                mService = null;
                mBoundToService = false;       
                mIsRunning = false;            
                return;
            }
    
            if (mFaceUnlockView != null) { 
                IBinder windowToken = mFaceUnlockView.getWindowToken();
                if (windowToken != null) {     
                    // When switching between portrait and landscape view while Face Unlock is running,
                    // the screen will eventually go dark unless we poke the wakelock when Face Unlock
                    // is restarted.               
                    mKeyguardScreenCallback.userActivity(0);
    
                    int[] position;                
                    position = new int[2];         
                    mFaceUnlockView.getLocationInWindow(position);
                    startUi(windowToken, position[0], position[1], mFaceUnlockView.getWidth(),
                            mFaceUnlockView.getHeight());
                } else {
                    Log.e(TAG, "windowToken is null in handleServiceConnected()");
                }
            }
        }
    
    
    I have an interesting finding. Since the face unlock code is proprietary from pittpatt which is now acquired by Google, we can not see the source code for the face unlock service. However, I get to know it uses the bound service to communicate with the face unlock model. And even more inspiring,  the startUi function exposes some implementation of the service. It passes the windowToken of keyguard window, the location and size of the face unlock view "place holder". Yes, I call it "place holder" since I believe it's only a place holder for the actual face unlock view which is added in the service implementation. So that in the face unlock view we can define the window parameters for the camera preview, which could solve the problem of camera preview won't show on keygurad window.
    So the next question is, "is it possible to create new view element in the background service?".  Yes, it is possible to draw window in the background service. The facebook chatheads proves that according to this article http://www.piwai.info/chatheads-basics/. So we did exactly the same thing, draw a new window at the place holder with the same location and size and set the window type to be TYPE_SYSTEM_OVERLAY. And also we want to keep the screen on while conducting the face unlock, we can set the FLAG_KEEP_SCREEN_ON to the new window. Then add SurfaceView to this window, the camera preview will show up this time!
    Now we are almost done unless for the face recognition service. I used two-way bound service for communication between the service and KeyguardSecurityView.
Acknowledgement:
Some of the content from this post refers the following websites:
  •  http://www.programering.com/a/MDOyIDNwATQ.html
  • http://www.cnblogs.com/haiming/p/2989678.html
  • pittpatt proprietary files: https://github.com/jamesonwilliams/vendor_google_gapps/tree/android-4.4.2_r1/proprietary/optional/face/vendor/pittpatt/models/detection/multi_pose_face_landmark_detectors.7
  •  facelock.apk: https://github.com/jamesonwilliams/vendor_google_gapps/find/android-4.4_r1.1/
  • Include jar in Android.mk: http://www.cnblogs.com/hopetribe/archive/2012/04/23/2467060.html
  • Chathead Basics:http://www.piwai.info/chatheads-basics/
  •   Binder and Window Tokens: http://www.androiddesignpatterns.com/2013/07/binders-window-tokens.html

Friday, January 23, 2015

Extend screen unlock setting

General idea of the stuff I put into Android system: We want to add our own face recognition program to Android system as one of the screen unlock methods. Basically, there are two things we need to consider:
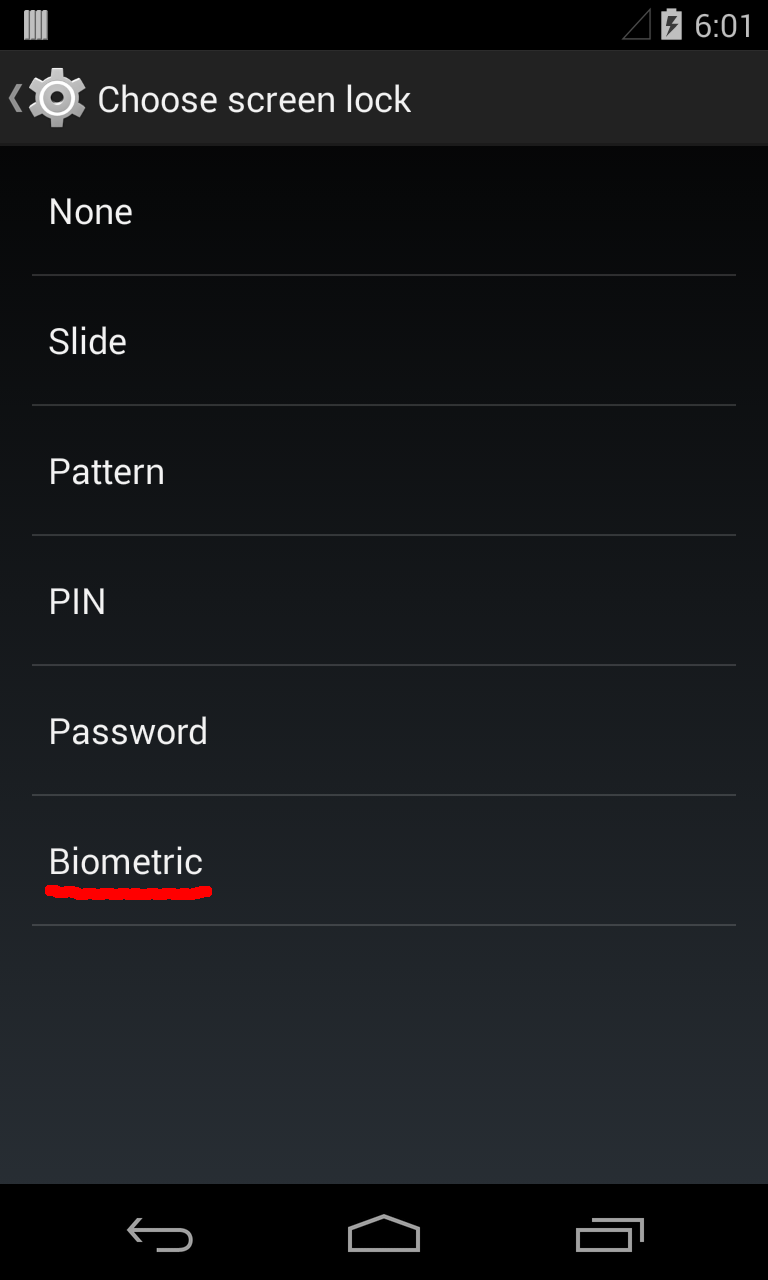
  1. Add face unlock entry to the Settings->Security->Screen lock menu as shown in fig. 1 (a).
  2. Add face unlock view to Android screen lock as shown in fig. 1 (b).
Face unlock settings
Fig1. (a) screen lock settings Fig. 1 (b) face unlock view
Before start, you'll need a Android system build tool chain, Android source code, Android SDK and an Android phone. Following is my spec. of development environment:
  • LG Nexus 4
  • AOSP: android-4.4.2_r2
  • Eclipse Luna with ADT plugin (Android API 19)
 OK, to figure it out how to extend Android system with the face recognition unlock, I spent a lot of time searching related articles. I don't think there are much articles and tutorials online that talk the whole process thoroughly. I did find people discussing related problems, but it's still hard to get the whole picture. Therefore, this article is all about how I integrated face unlock to android screen unlock code stacks.

Extend screen unlock settings

Add biometric entry to the unlock list in file “packages/apps/Settings/res/xml/security_settings_picker.xml” below "unlock_set_password" preference screen declaration


The definitions for the plain strings are in the "packages/apps/Settings/res/values/strings.xml"file. We add the unlock_set_biometric_strong below the "unlock_set_unlock_password_summary" as:

Biometric
Strong security, on trail
So that's the interface part, we need also figure out how the inner method call works.
Fig. 2 Face unlock settings sequence diagram
Fig. 2 illustrates the sequence diagram of how the interfaces interact. It all starts from the SecuritySettings class. The inheritance hierarchy is shown in Fig. 3.
Fig 3. SecuritySettings Class
We can see from the figure, eventually it extends Fragment class. According to android developers's page, "Fragment is a piece of an application's user interface or behavior that can be placed in an Activity. Interaction with fragments is done through FragmentManager, which can be obtained via Activity.getFragmentManager() and Fragment.getFragmentManager()". A Fragment is a small buildng block of the activity interface with its own life cycle depend on the activity life cycle. The method that conduct the UI inflation in this class is createPreferenceHierarchy. What this function does is generally load the UI componets and setup the preference. To load the UI fragment for screen security section, it retrieve the current screen lock password quality by invoking getKeyguardStoredPasswordQuality() method of LockPatternUtils class. For biometric authentication method, we add the usingBiometricStrong method to determine if face unlock method has been checked or not. If it is using face unlock, the resource id would be set to the face unlock preference screen interface id. Note that the function first check if the current unlock method is secure or not secure by the LockPatternUtils.isSecure function.
 public boolean isSecure() {
        long mode = getKeyguardStoredPasswordQuality();
        final boolean isPattern = mode == DevicePolicyManager.PASSWORD_QUALITY_SOMETHING;
        final boolean isPassword = mode == DevicePolicyManager.PASSWORD_QUALITY_NUMERIC
                || mode == DevicePolicyManager.PASSWORD_QUALITY_ALPHABETIC
                || mode == DevicePolicyManager.PASSWORD_QUALITY_ALPHANUMERIC
                || mode == DevicePolicyManager.PASSWORD_QUALITY_COMPLEX;
        final boolean isBiometricStrong = mode == DevicePolicyManager.PASSWORD_QUALITY_BIOMETRIC_STRONG;
        final boolean secure = isPattern && isLockPatternEnabled() && savedPatternExists()
                || isPassword && savedPasswordExists() || isBiometricStrong;
        return secure;
    }  
We add the biometric authentication also to be secure.
After that, it calls the addPreferencesFromResource of the PreferenceActivity class which "Inflates the given XML resource and adds the preference hierarchy to the current preference hierarchy".

Then as the other UI components, it waits for user action and pass control to other component. For PreferenceActivity class or subclasses, the action handler function in response to user click is onPreferenceTreeClick. It determines which preference element is being clicked by checking the preference key for each UI element. But what's the key of preference? Where was it set? Remember in the createPreferenceHierarchy we loaded the preference by resource id? It's right in the xml files that define the corresponding UI interfaces that the IDs are declared.
Following is the security_settings_biometric_strong.xml file that defines the settings interface when the biometric unlock is selected. We can see that line "android:key="unlock_set_or_change"" is where the preference key is set.
By checking the key, it starts the ChooseLockGeneric fragment when the screen lock entry is clicked.
final String key = preference.getKey();

        final LockPatternUtils lockPatternUtils = mChooseLockSettingsHelper.utils();
        if (KEY_UNLOCK_SET_OR_CHANGE.equals(key)) {
            startFragment(this, "com.android.settings.ChooseLockGeneric$ChooseLockGenericFragment",
                    SET_OR_CHANGE_LOCK_METHOD_REQUEST, null);
        } else if (KEY_BIOMETRIC_WEAK_IMPROVE_MATCHING.equals(key)) {
            ChooseLockSettingsHelper helper =
                    new ChooseLockSettingsHelper(this.getActivity(), this);
            if (!helper.launchConfirmationActivity(
                    CONFIRM_EXISTING_FOR_BIOMETRIC_WEAK_IMPROVE_REQUEST, null, null)) {
                // If this returns false, it means no password confirmation is required, so
                // go ahead and start improve. 
                // Note: currently a backup is required for biometric_weak so this code path
                // can't be reached, but is here in case things change in the future
                startBiometricWeakImprove();   
            }

And ChooseLockGenericFragment is also of the SettingsPreferenceFragment type. Take a look at the onCreate function of the fragment
 @Override             
        public void onCreate(Bundle savedInstanceState) {
            super.onCreate(savedInstanceState);                                                                                               

            mDPM = (DevicePolicyManager) getSystemService(Context.DEVICE_POLICY_SERVICE);                                                     
            mKeyStore = KeyStore.getInstance();
            mChooseLockSettingsHelper = new ChooseLockSettingsHelper(this.getActivity());                                                     

            // Defaults to needing to confirm credentials
            final boolean confirmCredentials = getActivity().getIntent()
                .getBooleanExtra(CONFIRM_CREDENTIALS, true); 
            if (getActivity() instanceof ChooseLockGeneric.InternalActivity) {
                mPasswordConfirmed = !confirmCredentials;                                                                                     
            }

            if (savedInstanceState != null) {  
                mPasswordConfirmed = savedInstanceState.getBoolean(PASSWORD_CONFIRMED);
                mWaitingForConfirmation = savedInstanceState.getBoolean(WAITING_FOR_CONFIRMATION);
                mFinishPending = savedInstanceState.getBoolean(FINISH_PENDING);                                                               
            }

            if (mPasswordConfirmed) {          
                updatePreferencesOrFinish(); 
            } else if (!mWaitingForConfirmation) {
                ChooseLockSettingsHelper helper =      
                        new ChooseLockSettingsHelper(this.getActivity(), this);
                if (!helper.launchConfirmationActivity(CONFIRM_EXISTING_REQUEST, null, null)) {
                    mPasswordConfirmed = true; // no password set, so no need to confirm                                                      
                    updatePreferencesOrFinish(); 
                } else {      
                    mWaitingForConfirmation = true;                                                                                           
                }
            }
        }


the settings program doesn't show the unlock methods list to the user directly. It first checks if the current user has confirmed the unlock credential or not. If so, the undatePreferenceOrFinish function will be called.
 private void updatePreferencesOrFinish() {
            Intent intent = getActivity().getIntent();
            int quality = intent.getIntExtra(LockPatternUtils.PASSWORD_TYPE_KEY, -1);
            if (quality == -1) {
                // If caller didn't specify password quality, show UI and allow the user to choose.
                quality = intent.getIntExtra(MINIMUM_QUALITY_KEY, -1);
                MutableBoolean allowBiometric = new MutableBoolean(false);
                quality = upgradeQuality(quality, allowBiometric);
                final PreferenceScreen prefScreen = getPreferenceScreen();
                if (prefScreen != null) {
                    prefScreen.removeAll();
                }
                addPreferencesFromResource(R.xml.security_settings_picker);
                disableUnusablePreferences(quality, allowBiometric);
            } else {
                updateUnlockMethodAndFinish(quality, false);
            }
        }
In the caller doesn't already specify the password quality, it will load the security_settings_picker preference tree and let the user select unlock method. Otherwise, it goes directly to the updateUnlockMethodAndFinish function. If the control flow goes from the security_settings_picker and the user pick up the unlock method, it also goes to the updateUnlockMethodAndFinish. So let's check what happens in that method.
       void updateUnlockMethodAndFinish(int quality, boolean disabled) {
            // Sanity check. We should never get here without confirming user's existing password.
            if (!mPasswordConfirmed) {
                throw new IllegalStateException("Tried to update password without confirming it");
            }

            final boolean isFallback = getActivity().getIntent()
                .getBooleanExtra(LockPatternUtils.LOCKSCREEN_BIOMETRIC_WEAK_FALLBACK, false);

            quality = upgradeQuality(quality, null);

            if (quality >= DevicePolicyManager.PASSWORD_QUALITY_NUMERIC) {
                int minLength = mDPM.getPasswordMinimumLength(null);
                if (minLength < MIN_PASSWORD_LENGTH) {
                    minLength = MIN_PASSWORD_LENGTH;
                }
                final int maxLength = mDPM.getPasswordMaximumLength(quality);
                Intent intent = new Intent().setClass(getActivity(), ChooseLockPassword.class);
                intent.putExtra(LockPatternUtils.PASSWORD_TYPE_KEY, quality);
                intent.putExtra(ChooseLockPassword.PASSWORD_MIN_KEY, minLength);
                intent.putExtra(ChooseLockPassword.PASSWORD_MAX_KEY, maxLength);
                intent.putExtra(CONFIRM_CREDENTIALS, false);
                intent.putExtra(LockPatternUtils.LOCKSCREEN_BIOMETRIC_WEAK_FALLBACK,
                        isFallback);
                if (isFallback) {
                    startActivityForResult(intent, FALLBACK_REQUEST);
                    return;
                } else {
                    mFinishPending = true;
                    intent.addFlags(Intent.FLAG_ACTIVITY_FORWARD_RESULT);
                    startActivity(intent);
                }
            } else if (quality == DevicePolicyManager.PASSWORD_QUALITY_SOMETHING) {
                Intent intent = new Intent(getActivity(), ChooseLockPattern.class);
            intent.putExtra("key_lock_method", "pattern");
                intent.putExtra(CONFIRM_CREDENTIALS, false);
                intent.putExtra(LockPatternUtils.LOCKSCREEN_BIOMETRIC_WEAK_FALLBACK,
                        isFallback);
                if (isFallback) {
                    startActivityForResult(intent, FALLBACK_REQUEST);
                    return;
                } else {
                    mFinishPending = true;
                    intent.addFlags(Intent.FLAG_ACTIVITY_FORWARD_RESULT);
                    startActivity(intent);
                }
            } else if (quality == DevicePolicyManager.PASSWORD_QUALITY_BIOMETRIC_WEAK) {
                Intent intent = getBiometricSensorIntent();
                mFinishPending = true;
                startActivity(intent);
            } else if (quality == DevicePolicyManager.PASSWORD_QUALITY_BIOMETRIC_STRONG) {
                Intent intent = new Intent();
                intent.setClass(getActivity(), ChooseLockBiometric.class);
                //intent.setClassName("edu.temple.dulab.biounlock", "edu.temple.dulab.biounlock.FaceEnroll");
                //intent.addFlags(Intent.FLAG_ACTIVITY_FORWARD_RESULT);
                mFinishPending = true;
                startActivity(intent);
            } else if (quality == DevicePolicyManager.PASSWORD_QUALITY_UNSPECIFIED) {
                mChooseLockSettingsHelper.utils().clearLock(false);
                mChooseLockSettingsHelper.utils().setLockScreenDisabled(disabled);
                getActivity().setResult(Activity.RESULT_OK);
                finish();
            } else {
                finish();
    }
        }

Basically it switches control to other activity according to the selected password quality. So here we add the "PASSWORD_QUALITY_BIOMETRIC_STRONG" branch to direct the program to the face enrollment activity (ChooseLockBiometric). It that activity, we include a button to start face enrollment in the view.
       // FacerecActivity in com.philriesch.android.vflock;
                Intent intent = new Intent();
                intent.setClassName("com.philriesch.android.vflock", "com.philriesch.android.vflock.FacerecActivity");
                intent.putExtra(EXTRA_ENROLLMODE, true);
                startActivityForResult(intent, REQUEST_ENROLL_FACE);

We start the FacerecActivity located in the "com.philriesch.android.vflock" package. Once the activity result is received and is OK, we set the selected PASSWORD_TYPE_KEY to be PASSWORD_QUALITY_BIOMETRIC_STRONG and set the password quality for DPM in the LockPatternUtils instance.
That's the face enrollment extension to Android screen settings. Next we'll talk about extend keyguard to support face unlock.

Monday, January 12, 2015

Error: Couldn't load opencv_java from loader...

Build Android system app that requires opencv library could result in this opencv library loading error. One way to get around this is to build the shared library with the app. Here is the snippet of Android.mk that define the opencv_java module
...
include $(CLEAR_VARS)
LOCAL_MODULE    := libopencv_java
LOCAL_SRC_FILES := libs/armeabi/libopencv_java.so
include $(BUILD_PREBUILT)
...
To build the prebuilt library into system, include $(BUILD_PREBUILT) instead of $(PREBUILT_SHARED_LIBRARY). I tried the latter, the system still could locate the opencv library files.

Friday, January 9, 2015

Eclipse hangs on startup with the error essage " The org.eclipse.m2e.logback.configuration bundle was activated before the state location was initialized."

My eclipse version is Version: Luna Service Release 1 (4.4.1) The way I addressed that problem is: Delete the *.snap files under your eclipse workspace ".metadata/.plugins/org.eclipse.core.resources/" Be aware that after I restart eclipse, the projects under that workspace that I'm working on are gone. I need to re-import the projects later.